| How to apply carpeting • DiecastSociety.com |

How to apply carpeting
Author/Model:
Stephane St-Denis (aka GP246)
Welly Ford Mustang Boss 302 1970
Tools & Supplies:
Phillips Screwdriver (small)
Scissors
White Glue or Hobby Glue
Carpet Knife
Carpeting (the product used here was purchased at Dollarama, $0.25/sheet. Check your local hobby store, fabric centre or on-line resource)
A foreword, the “How To” section of DiecastSociety.com is intended as an instructional resource on how to perform these modifications at home. DiecastSociety.com or the person or persons involved in making this instructional do it yourself guide are not responsible for any damages or loss that may occur. Please know your limits, if you’re not 100% comfortable in performing some of these tasks we ask that you seek help from a professional. Good luck!
| STEP 1. | STEP 2. |
|
The first thing to do is to find yourself a clean and spacious work area, it will help to avoid losing any parts. Now you can continue by disassembling the car, locate the screws that hold the car in place. If you do not see them look a second time, they are probably hidden near the wheels. See photos #1-4.     |
Now that you have removed the screws you must remove the interior of the car. Be very careful to remember the position of the interior and various surrounding bits, it will be the most difficult item to remember position when re-assembling, we often over look this at the dis-assembly stage. In this case it’s an easy one to remember you just have to put a flat screwdriver underneath the front section and pull forward with little force. Don’t pull too hard! At this point in time it’s probably pointless for me to mention this but if this is your first attempt at diecast dis-assembly maybe a low budget model would be a better choice. See photo #5.
|
| STEP 3. | STEP 4. |
At this point remove anything you possibly can from the interior i.e. seats, shifter, dash, etc. The more obstacles you move now the easier it will be to cut and apply the carpet. Your goal is to have a clear interior floor! |
Choose your carpet colour! |
| STEP 5. | STEP 6. |
Now you can start to prepare your piece of carpet. Cut the carpet to fit exactly as to cover as much of the base as possible for your particular model. It some cases you might be able to cut the carpet in one single piece (if you are skilled with the scissors or knife). In some cases it may require two or more pieces depending on the layout. Use your better judgment here! See photo #8-9.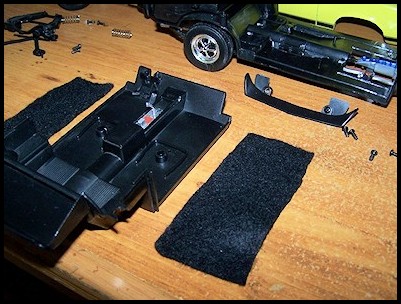  |
Once you are satisfied that the carpet is cut to perfection its time to glue it all into place. Apply the sparingly, just enough to cover the surface! Now position the carpet in place. Give it a few minutes to adhere. At this point you can cut through the carpet to expose mounting points for seats, pedals and other interior pieces. See photos #10-11.
|
| STEP 7. | STEP 8. |
|
Now you can mount your seats back into place. If you want to add a little personal touch your car as I did this is the time to do it. I added the Mustang Pony logo to the carpet just in front of the seats, after all it is a Mustang! Whatever model you are working on this is a good time to spruce up the interior if you choose.
|
Now let’s start on the trunk. In this case our only obstacle is the spare tire, remove it. Now cut a new piece of carpet and glue into place as detailed in Step #5 and #6.
|
| STEP 9. | STEP 10. |
|
Now its time to reassemble the car, but first if you find any excessive carpeting interfering with the reassembly cut it off. Also as you can see in the photo below there is a lighter near me, it’s there for a reason, when you have finished setting your carpet take the lighter and burn any stray or long carpet hairs away. CAUTION! Do this quickly and efficiently as possible as your plastic bits are at risk of being damaged by the heat from the flame!
|
Now you are ready to fully reassemble the car. Go for it! With a little more practice you can challenge yourself with more detailed project or add those personal touches I talked about earlier. Pat yourself on the back my friend, job well done. Now your budget model is worth AUTOart money! Enjoy!!
|


